
This is a simple example of what can be done with a couple of figures, a razor blade and a bottle of super glue. Maybe a small hand drill and bit and a paper clip, too.
Simple Conversion Project Bill Nevins the Project
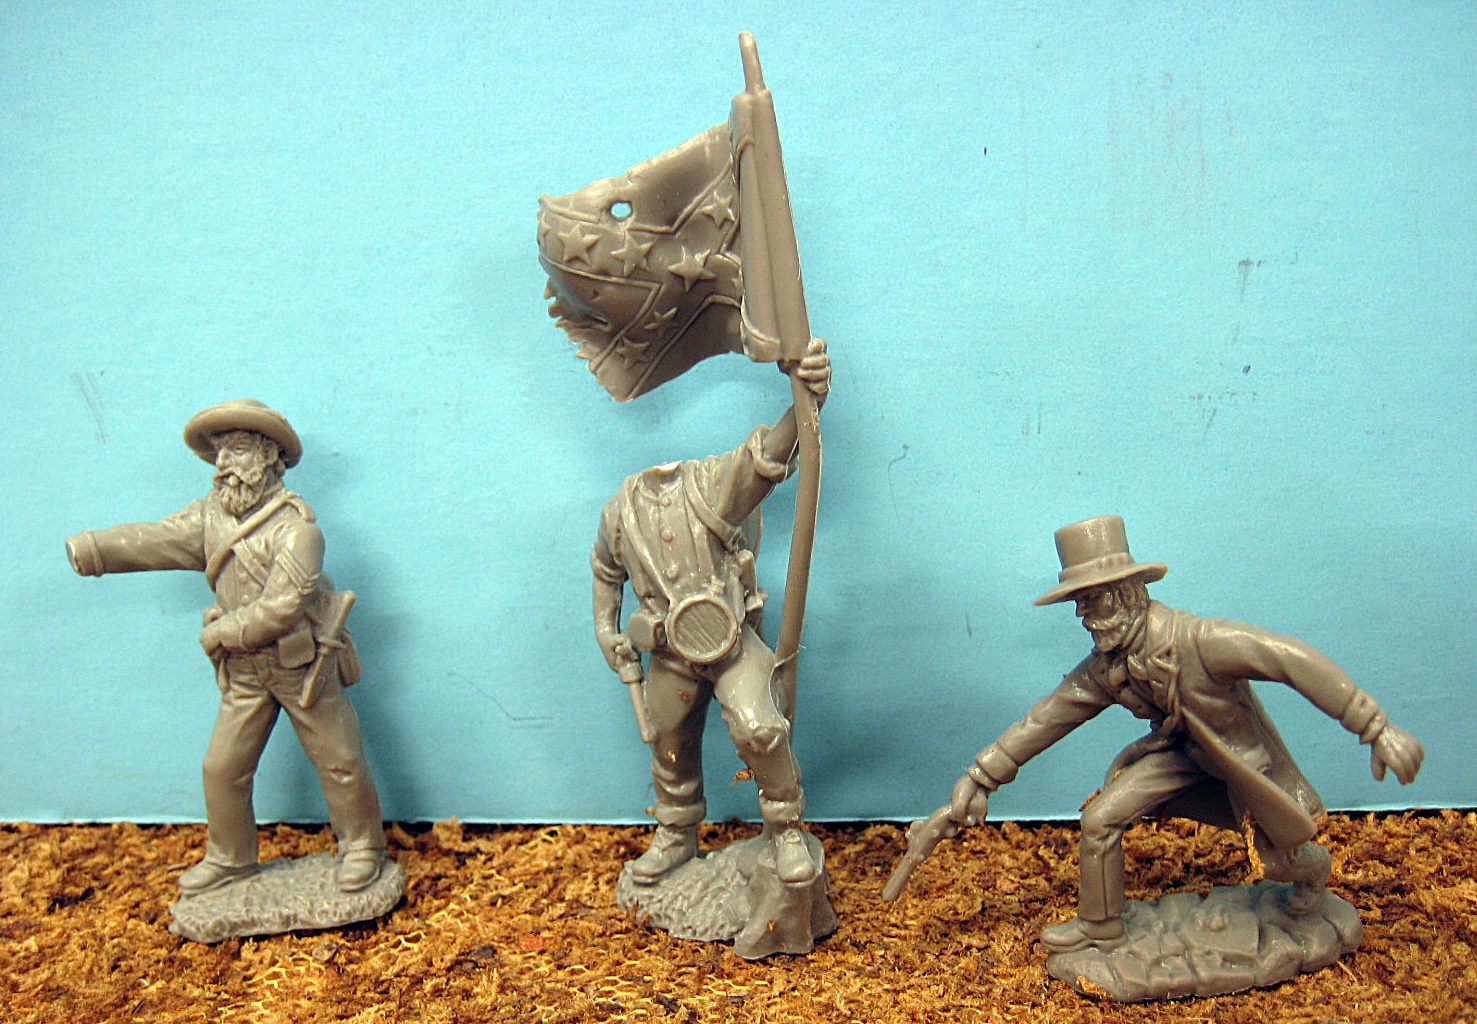
The far left figure donated his hand and pistol. A quick slice of the razor and the hand comes off clean at the wrist.
The Flagbearer lost his head for the cause. Cutting heads is a bit trickier. If your trying this for the first time, do some dry runs on a couple of junk or broken figures first. Just to get the feel of it.
OK, I’ll start underneath the chin here. Position the blade under the chin. Make sure the edges of the blade clear the shoulders and anything else in the way.
Now cut upwards until you reach the end of the neck. Cut slowly, letting the blade do the work. Wiggle it back and forth while it cuts through.
Now reverse the figure and start cutting from the back of his head at the collar line. Again go slow and don’t cut the guys shoulders off. When the cuts meet the head will just pop off.
The man on the right lost his head and his hand. But we’re going to fix that.
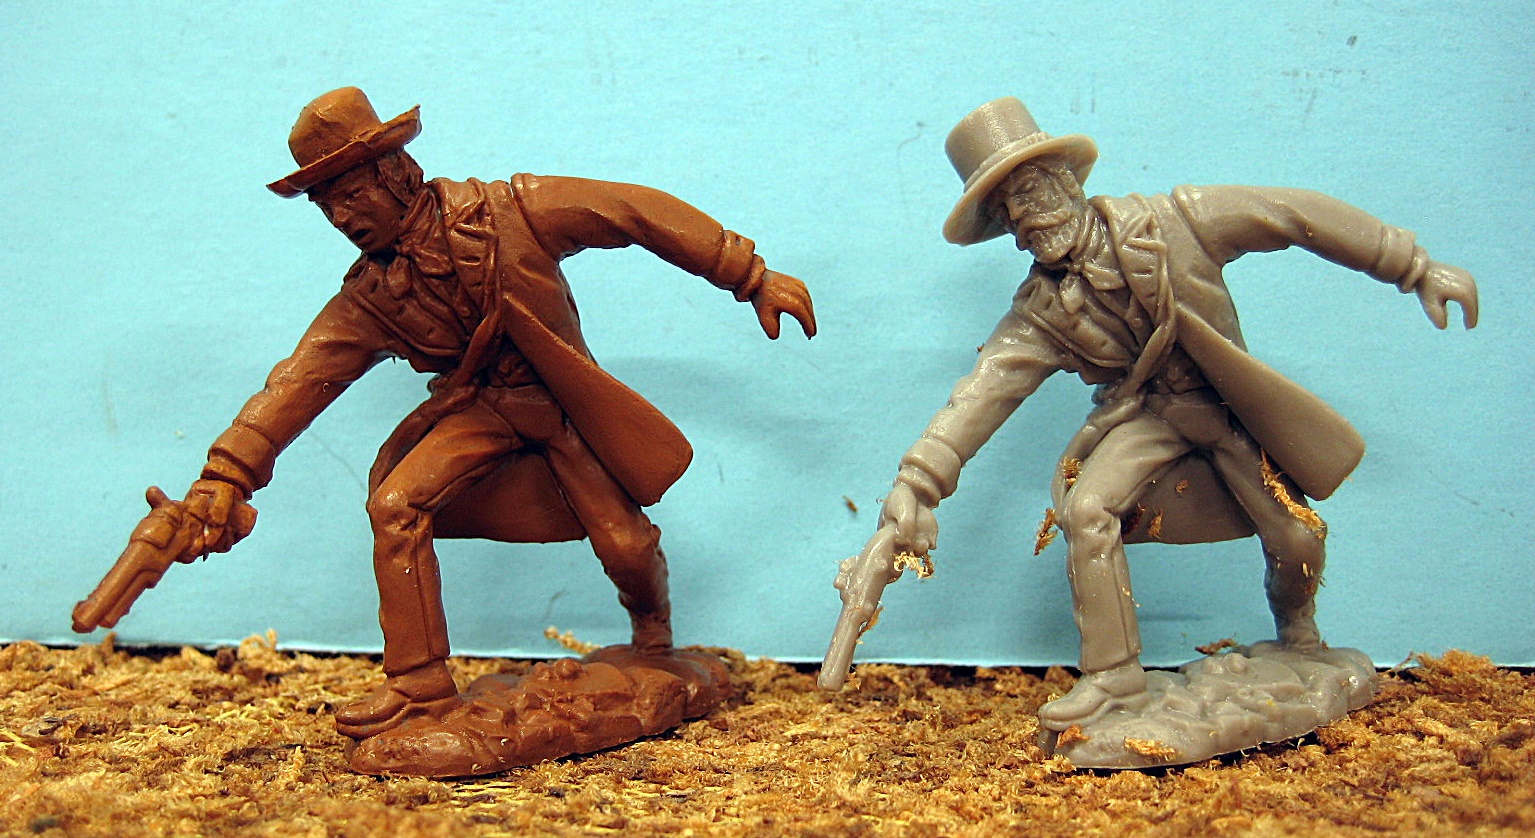
This shows the stock gray figure on the right and the final converted figure on the left.
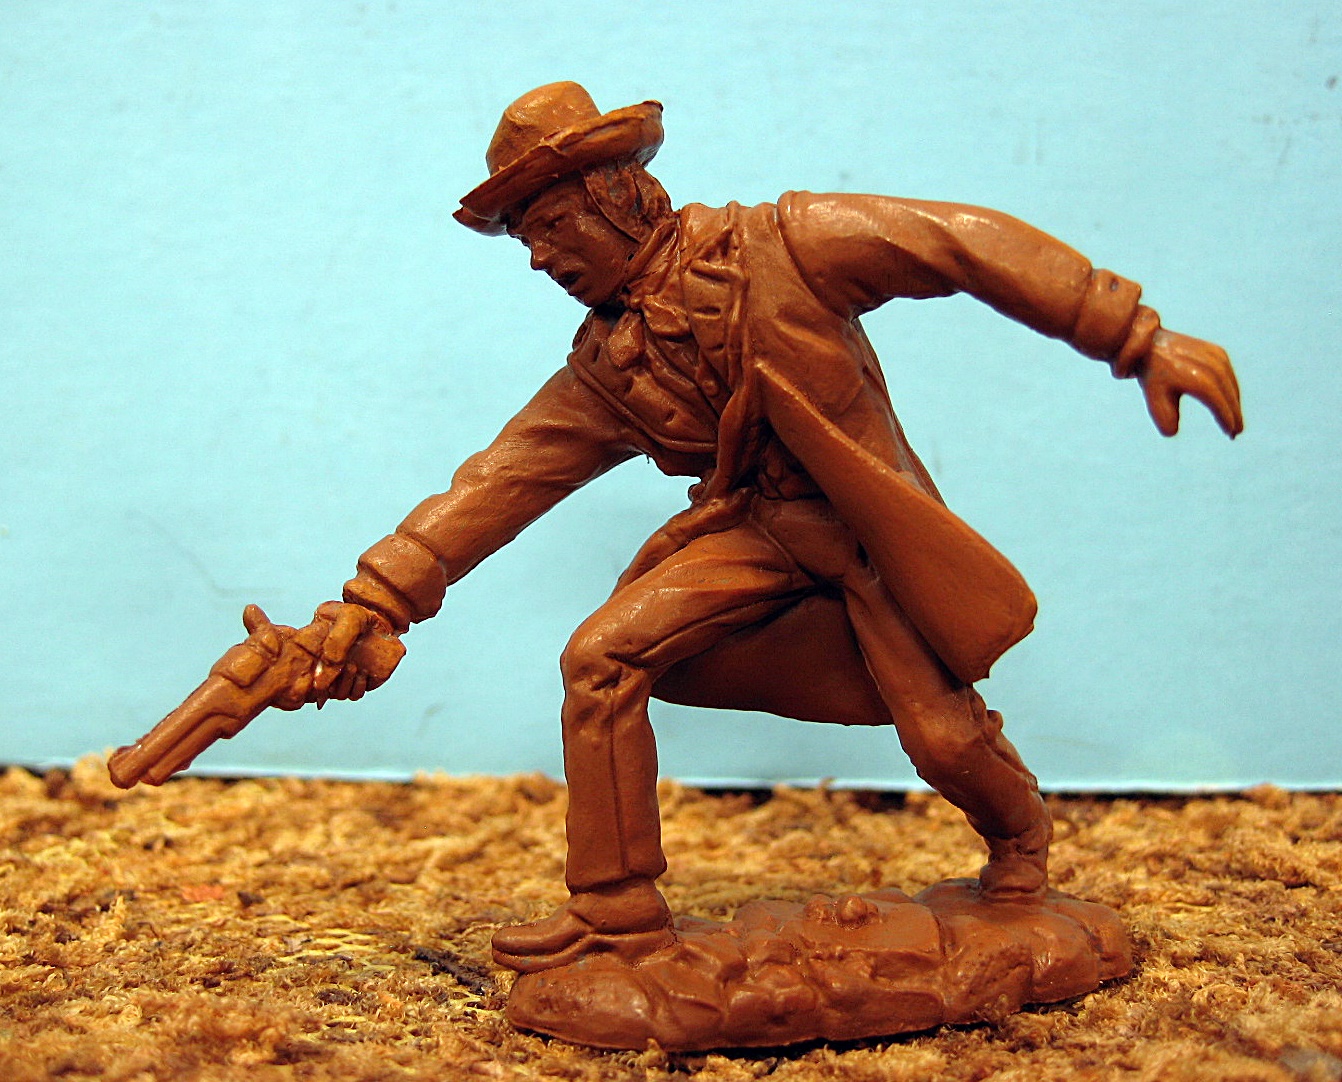
I wanted a figure that could fire down from a second story Western Town. The new Paragon Alamo defender was just the pose I was looking for. Unfortunately, he needed a new head and a pistol. He’s shooting a flintlock and I wanted a six shooter.
Simple Conversion Project Bill Nevins the Conversions
So off with his head. I used the TSSD CSA Flagbearere’s head because the face is young looking and the hat is perfect. These new figures (Conte,TSSD, Paragon etc) use a plastic that bonds with superglue and takes paint with no problem. A vast improvement over polypropylene for us converters.
I glued the head in place without pins. Loctite Professional SuperGlue is all I use. Next I removed his hand and used a pin vise (hand held mini drill) to drill into the are and the hand with the pistol in it. A large paper clip provided the pin and the hand was glued in place. The hand came from a TSSD CSA Officer and was just what I was looking for. Next, I painted the figure Snakebit Leather which is a cool western color.
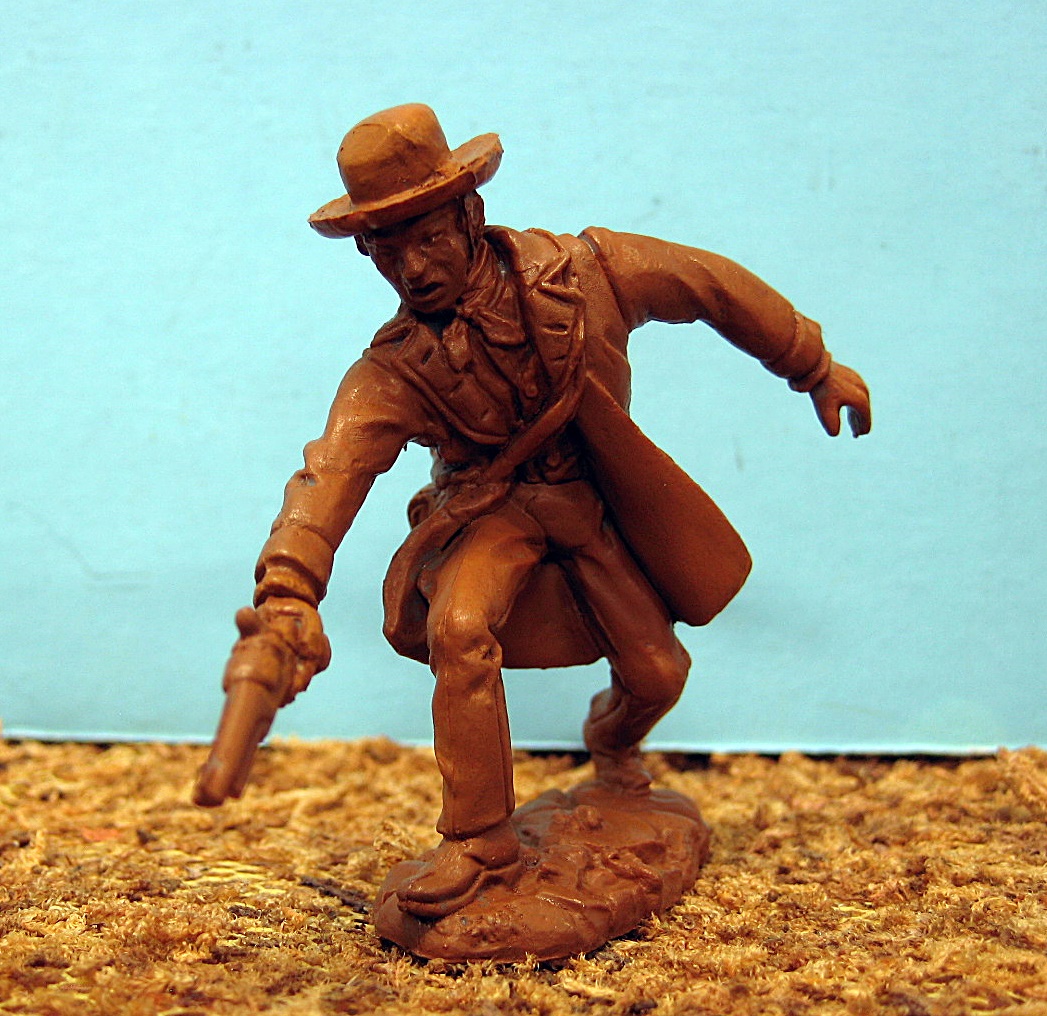
And here’s a close up of the final product.
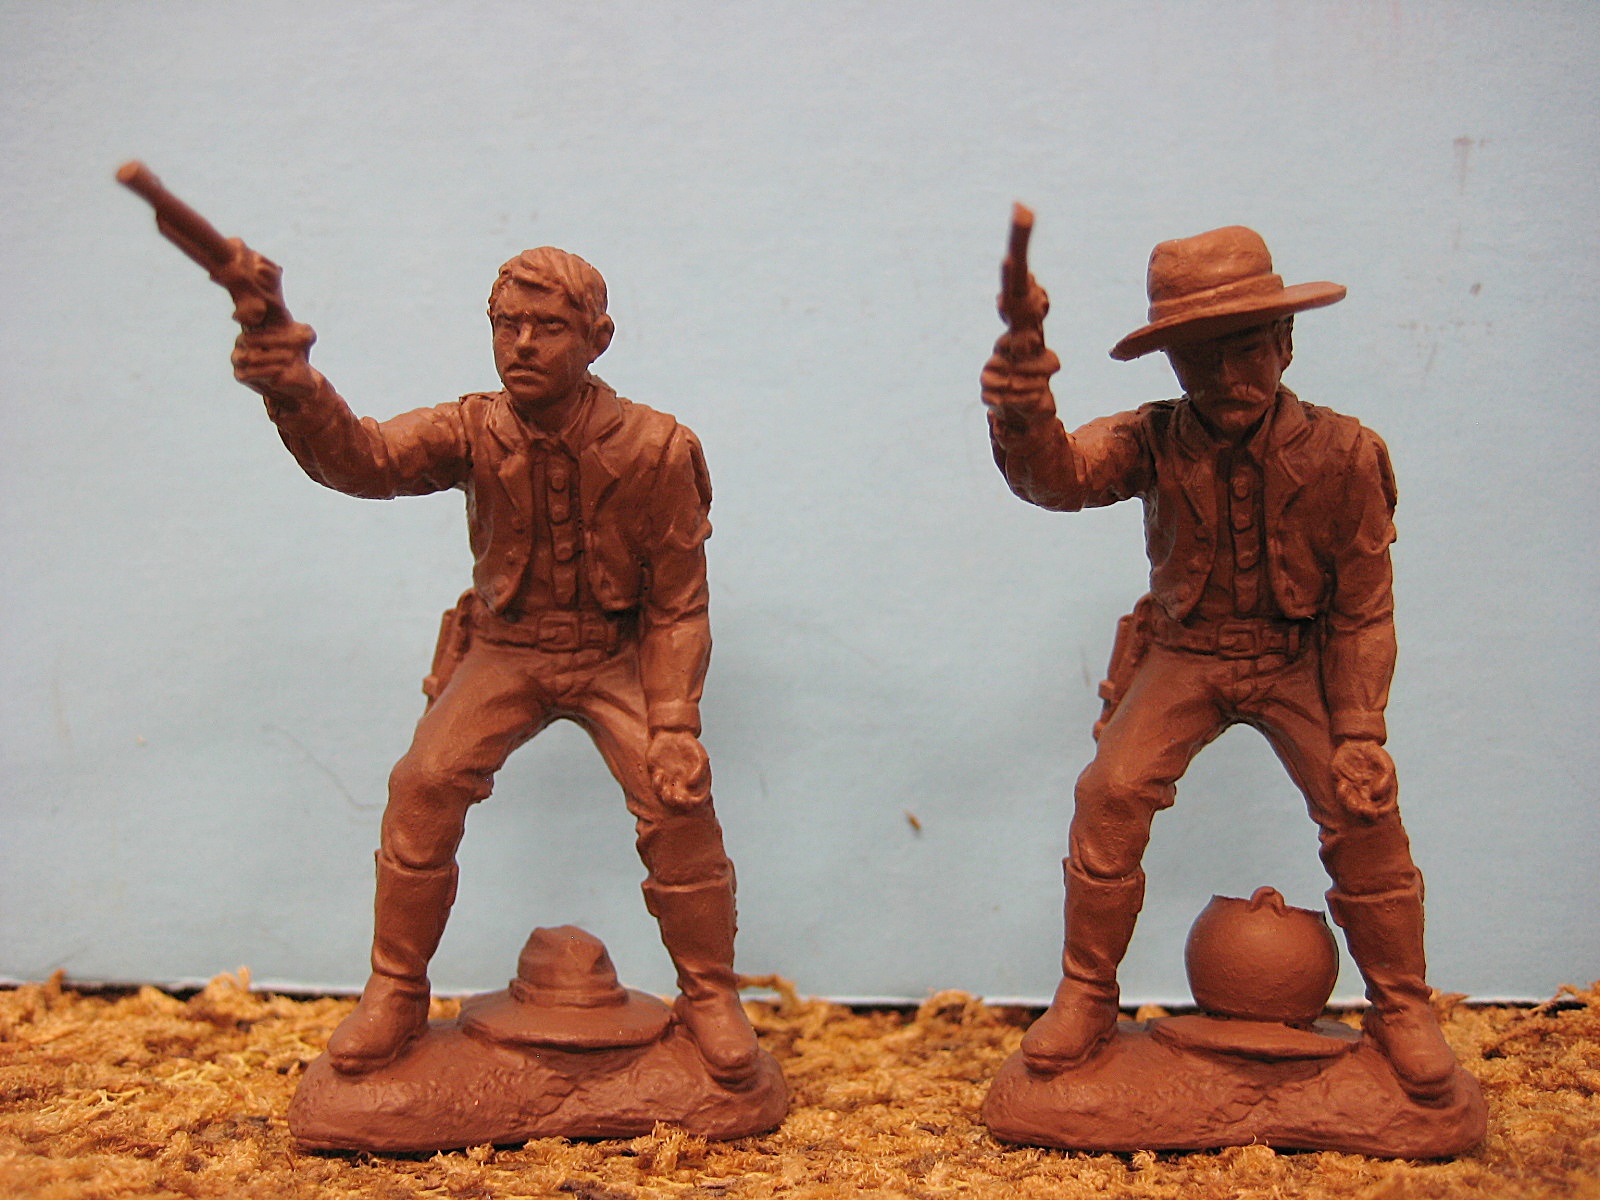
Here’s 2 Cowboy poses that came out well. The figure on the right has had his barehead replaced by a head with a hat on. I cut down the top of the hat and glued a small pot on top of the flat part of the hat. The pot came from some figure’s hand, I forget which. Anyway, it totally changes the figure. The pot looks like it’s sitting on a platter or dish. A simple addition to the base makes all the difference here.
Simple Conversion Project Bill Nevins Final Words
Just another view of the completed conversion.
That’s it for now. Any questions ? Feel free to ask.
I believe that cowboy stole GEN Salad’s chamber pot and from his pose, it looks like he intends to use it!
If I was facing down Doc Holiday I would probably NEED it… the pot that is.
Great job, Bill. Love the head swap and the six-shooter change.
Instead of a drill and a paper clip, I use a push pin to make my hole and fill it with a straight pin. I used to use wire or paper clips but found that often the part I want to attach is too small for the size of the hole the paper clip will make.I just use my combo pliers, wire cutter to push the pin in to the hole to the desired depth and cut off the excess pin. It works well for me and I don’t have to mess with a drill. I of course use glue in addition to the pin. Plus the somewhat jagged end of the pin when cut gives some added grab to the part you want to add.
Problems with locktite drying in the bottle quickly
Once you open is suppose to be use all.That is way they sale small tubes most time.
After many attempts at different glues I have had the best results with brush on Crazy Glue. I hardly ever glue my fingers together. It does run a bit, but when it’s dry it’s easy to scrape off the excess. I’ve found with the brush it’s much easier to apply the glue where you want.
I did use krazy glue x years.But with some plastic it did not work well x me.Once I use Locktive as per Bill sugestion it resolved my issues.My experience.
The glue in my fingers is not big issue.Isopropil alcohol take most off in minutes.
My thoughts….
Best…
Ed I use a cheap, 12 for a buck, brush from the Dollar store to brush it on.
I glued an arm on using Loctite Professional and a minute later I couldn’t move it.
Loctite Pro comes in a bottle with a replaceable air tight cap, so there are NO problems with it drying out. I go through a bottle in a month and use every last drop.
The fellow firing down from a rooftop in Snakebit leather looks so much improved over the original figure. That’s a great looking conversion. I like the new hat! A porkpie, maybe?
The chamber pot guy looks like his arm has been adjusted; or is that my imagination. Looks like the guy is facing Clint Eastwood in a Sergio Leone movie! He should take the chamber pot and run!
Interesting discussion. I’ve never attempted plastic conversions (done plenty of metal conversions) ’cause I didn’t know the techniques. After reading these posts, I may give plastic conversions a try.
When doing Swaps with Heads, I cut just inside the collar and around the neck down to the shirt front.
About two years ago, I began using Gorilla Super Glue and Kneadtite together to reattach figure parts.
Interesting how we all have our own little tricks & preferences. I use straight pins that I push directly in with needle nose pliers, clip off and push on the attached part after starting it with a pin hole. With patience and a flame, I can even get a pin into a soft metal head. I use X-acto type knives for cutting & carving. It’s worth it to keep fresh sharp blades in the handle. I once slipped with a dull blade and severed a finger tendon that required surgery to reattach. A LOT cheaper to use sharp blades. Took quite a while before I did my next conversion after that one. Prefer Krazy Glue gel, although Loctite Professional sometimes works better. I use nail polish remover to get it off my fingers. When I nick my fingers, I actually seal the cuts with Krazy Glue. Some plastics, like recast Marx, don’t glue at all, but the pins hold and I seal over the seams with paint. I guess the bottom line is, there is no real “right” or “wrong” way to do it as long as you’re happy with the figures.
I also use a bic lighter for tightening up the seams when I add a part, I heat up the exacto and apply it to the seam of the part I am attaching. It does a good job of sealing up those little gaps that can occur. I’m a real freak about those little gaps.
Has anyone tried the product that Mich TS is selling?
Tricky Stick
It’s supposed to make any type of plastic react to super glue. Like Andy, I’ve tried every adhesive known to man and nothing works on soft plastic, especially re issue stuff.
I’ve read elsewhere that it’s just a chemical that you can buy much cheaper from a chemist. I’ve no idea if that’s true or not.
Ed, Gary Dutko introduced me to his welder that can be adjusted on low setting for plastic and only $14.95: http://www.mpja.com/Mini-Solder-Station-ZD-99/productinfo/15860+TL/
similar to hot knife technique. Also use gas stove burner for heat.
The little gaps ARE awful. Goop or even Elmer’s white glue works to fill them, also.
Bill, have to try Tricky Stick one of these days. It does get frustrating when the glue sticks my pliers shut, sticks my fingers together, sticks tools to table, and sticks everything else BUT the @*&!#@*& plastic! I have lucked out sometimes by painting the plastic parts BEFORE gluing them. The glue will stick the paint. Obviously, just have to go gentle with figures afterwards.
Gary Dutko told me about his low heat capable soldering unit that’s only $14.95 and adjusts down to melt but not burn up plastic:
http://www.mpja.com/Mini-Solder-Station-ZD-99/productinfo/15860+TL/
Same principle as hot blade.
Have to try Tricky Stick. I have found that painting the parts BEFORE gluing will work because the glue sticks to the dried paint surface. Obviously, have to be gentle with figures afterwards. Have had glue stick pliers shut, tools to table, fingers together and just about anything BUT the damned plastic!!
Yeah Gary told me about is soldering iron method and gave me a link where I could buy them. He also warned me it didn’t work with all plastics, that it was better for early Conte Canadian plastic. Of course he told me about this a long time ago and he may have switched soldering irons since then. I think Delsons conversions are all done with a hot knife or something of that nature, he does some imaginative poses, but the figures are often left with thin strings of plastic hanging off them in different parts and some parts are just blobs of plastic. Gary makes quality conversions, but on more of an assembly line format. He recently sent me a bunch of parts and he takes some parts from the same guys over and over and makes multiple of the same pose. Not that there is anything wrong with that. I try for the most part to make my conversions unique, can’t always do that, but I try. I tried a nasal cauterizer, but that set fire to the figures so I gave that up. I do want to try some type of filler though, just trying to decide what type is best that I don’t have to mix.
Post got repeated because both must have got caught in the “review” file due to the attachment? Thought I just lost the first one, but figured it out when the SECOND one didn’t show up at first either. Sorry for redundancy.
I use the same technique as Ed, very low tech; a straight pin, a push pin, needle nose pliers, Loc Tite, or Super Glue gel. With Hard plastic figures such as BMC you can sometimes just use the Loc Tite. I find Super Glue gel is also good for filling in seams, if you paint or prime your figures you won’t even notice the seama.
I like to call my method the KISS method.